Retaining Wall Cost in Vancouver: What Homeowners Actually Need to Know
Most homeowners find out what a retaining wall really costs the same way: they get a quote that's two or three times what they expected and don't understand why. They Googled "retaining wall cost Vancouver," found a range of $50 to $200 per square foot, and assumed their wall would land somewhere in the middle.
It might. But it might not. The gap between a $15,000 wall and a $125,000 wall rarely comes down to the wall itself. It comes down to everything else: what's above the wall, what's underneath it, whether a machine can reach the site, and whether the job needs an engineer. On a flat lot in Burnaby with good access, a straightforward concrete block wall is a reasonable budget exercise. On a North Shore hillside lot with a garage at the top and soft soil below, you're solving a structural engineering problem, and the cost reflects that.
This post covers what actually drives retaining wall cost in Greater Vancouver, what each wall type is genuinely suited for, what the permit rules look like across five municipalities, and what two of our real projects cost, with the breakdown. We publish real numbers because vague ranges don't help anyone make a decision.
What Kind of Wall Do You Actually Need?
Before cost makes any sense, you need to understand what you're building. "Retaining wall" covers a wide range of structures, from a two-foot garden border to an engineered concrete wall holding back a hillside. The right wall type depends on height, soil conditions, what's above and below, and how much space you have to work with.
Treated Timber
Timber walls are the lowest-cost option on paper and the most commonly recommended by landscapers. Posts are set into the ground, timbers are stacked horizontally, and deadman anchors extend back into the hill for stability.
We've built treated timber and landscape tie walls. It's not our preference, and it's not what we'd recommend in most situations. But we understand that budget doesn't always allow for the alternatives, and there are scenarios where timber is the right call for a client. When we do build them, we're upfront about the downsides.
Lifespan on treated timber walls in the Lower Mainland varies significantly. We've been called in to repair walls that are only ten years old. In a climate as wet as ours, especially on the North Shore, timber simply doesn't last. The cost looks attractive upfront and becomes expensive over time.
The walls we're most often called to repair or replace have one or more of the same problems: no deadman anchors or undersized ones, no drainage behind the wall, above-ground pressure treated lumber used instead of in-ground rated material, and undersized posts or timbers for the load. These aren't unusual oversights. They're the norm on landscaper-built timber walls.
Best suited for: Lower budget projects where the client understands the lifespan tradeoff; low-exposure locations with minimal surcharge loads above.
Lifespan in Metro Vancouver: Variable. We've seen failures at 10 years. Properly built with drainage, longer is possible.
North Shore recommendation: Not recommended due to rainfall and wet soil conditions.
Interlocking Concrete Block
Interlocking concrete block systems are engineered modular units designed to stack with a built-in batter (a backward lean) that provides natural stability. Split face block is one of the systems we work with. These walls are widely used in residential construction, look clean, and perform well when built correctly.
The critical details are base preparation, batter, and drainage. A poorly prepared base or insufficient batter and the wall will move. Drainage is always required, and the question that gets overlooked is where that drainage actually goes. On a North Shore lot with a steep grade and limited outlet options, drainage routing needs to be figured out before the wall is designed, not after.
We bring in an engineer for pretty much any interlocking concrete block wall. The gravity range has limits, and once you're dealing with meaningful height, surcharge loads, or North Shore soil conditions, you need signed drawings.
Best suited for: Residential walls where aesthetics matter and engineering is required; good performance at moderate heights.
Drainage: Always required. Outlet location must be confirmed before design.
Engineer: Required for virtually all residential applications.
Concrete Block (CMU)
Concrete masonry units, standard concrete block, offer more structural rigidity than interlocking systems and are more economical than poured concrete. The reason is straightforward: you don't have to build formwork, pay for a concrete truck and pump truck, and then strip it all down when the pour is done. CMU walls are built in place and the concrete used inside is typically mixed on site. You build it once.
For walls up to around 4 feet, CMU is a practical and cost-effective choice. Over 4 feet, engineering is required, and at that point the decision between CMU and poured concrete becomes a conversation with the engineer about load, site conditions, and long-term performance.
Best suited for: Walls up to approximately 4 feet where structural rigidity is needed but poured concrete isn't warranted; more economical than forming and pouring.
Engineer: Required for walls over 4 feet.
Poured Concrete
Poured concrete is the structural workhorse for walls that need to perform. A cantilever design (an L or T-shaped footing with a vertical wall stem) is the most common residential configuration. The footing distributes load across a wide base; the wall stem resists the lateral pressure from the retained soil.
What drives the cost up on poured concrete jobs is the process. You have to build formwork out of wood, pour the concrete (sometimes with elaborate boom pump trucks that reach over homes), and then strip all the formwork after curing. A concrete pour day can easily have 12 or more people on site. You have one chance to get the concrete in properly. That's what you're paying for.
One thing we tell every client before a poured concrete wall goes in: the wall will not be perfect, and there will be hairline cracks. We do our best to install architectural crack lines to control where cracking occurs, but concrete has a mind of its own. These are cosmetic cracks. They don't affect structural performance, and they can be addressed with sacking the concrete. We think of it as the wall aging gracefully. Clients who know this going in don't have complaints. Clients who don't know it sometimes do.
Best suited for: Taller walls (4 feet and over), walls supporting structures or driveways above, sites where long-term structural performance matters.
Key consideration: One pour, no second chances. Site access for pump equipment must be confirmed before the job is priced.
Natural Stone
Natural stone walls are the premium residential option, and the reasons homeowners choose them are almost always aesthetic. On the North Shore in particular, many properties have existing natural stone walls, and when clients want to add a wall that matches, stone is the only answer.
The cost premium is both labour and materials. Sourcing good stone takes time, and the craft component of laying it properly is significant. There's also a height limit: we generally cap natural stone walls at around 3 to 4 feet without structural backing. Stone can't be reinforced the way concrete or block can, so beyond that height, the wall starts to become a structural concern rather than a landscape feature.
When clients want the look of natural stone on a taller structural wall, there's a solution: pour a concrete wall and apply a stone face to it. You get the structural performance of concrete and the aesthetic of stone.
Best suited for: Aesthetic applications, matching existing stone on North Shore properties, walls up to approximately 3 to 4 feet.
Height limit: Approximately 3 to 4 feet as a standalone structure. Taller applications require a concrete structural wall with stone facing.
Cost drivers: Both labour and materials.
Engineered Wall Systems (Tie-Back and Geogrid)
When a site's conditions (height, slope, surcharge loads, soil conditions, or available space) exceed what any of the wall types above can handle, the solution moves into engineered wall systems territory. This includes tie-back walls, where steel tendons are anchored into stable soil or rock behind the wall, and geogrid-reinforced (MSE) walls, where layers of polymer mesh extend back into compacted fill to create a reinforced soil mass.
These walls aren't chosen by the contractor or the homeowner. On complex sites involving structural engineers and geotechnical engineers, the wall type is determined through that process. It's often the answer when a large portion of a property needs to be retained and conventional approaches aren't viable.
For geogrid walls specifically: the wall face is non-structural. It's the reinforced earth mass behind it that provides the structural resistance. The installation sequence of compaction lifts and grid placement is methodical and less forgiving than block or timber work. I've built a number of these across projects in the Lower Mainland. When they're done correctly, they perform exceptionally well on hillside sites.
These walls require a structural or geotechnical engineer for design and field review regardless of height. You don't choose an engineered wall system. The site and the engineering process tell you it's what's required.
Best suited for: Complex sites holding back large portions of a property; when conventional gravity, cantilever, or block solutions aren't viable.
Engineer required: Yes, always. Geotechnical investigation typically required.
North Shore: Common on North Shore hillside lots due to slope grades and load conditions.
What Drives Retaining Wall Cost
This is the part homeowners most consistently get wrong. Not because they're not thinking carefully, but because online cost estimators only account for the wall. On a typical Greater Vancouver residential project, the wall is often less than half the total cost.
Wall Height: The Multiplier, Not the Meter
Height is the most significant single driver of cost, but not in a linear way. Lateral soil pressure increases with the square of wall height. A wall that's twice as tall doesn't carry twice the load. It carries roughly four times the load. The engineering, the footing depth, the drainage complexity, and the material quantity all increase accordingly.
A 3-foot interlocking block wall and a 6-foot poured concrete wall are not the same job with different measurements. They're different structural problems.
Wall Length
Linear footage drives material quantity and labour hours. One practical note: site mobilisation, equipment delivery, and permit administration have a fixed cost component, which means short walls (under 20 feet) tend to have a higher per-foot cost than longer runs. The Pitt Meadows project at $10,000 and the New Westminster project at $125,000 are at opposite ends of the scale. Wall type and size explain much of the difference, but they're also structurally different problems.
Material Selection
From lowest to highest installed cost, roughly:
Treated timber
Interlocking concrete block
Concrete block (CMU)
Poured concrete
Natural stone
Engineered systems (tie-back, geogrid)
These are order-of-magnitude rankings, not fixed prices. Retaining walls vary too much in site conditions, access, drainage requirements, and engineering complexity to publish meaningful per-foot ranges by material type. The same poured concrete wall can cost $80,000 on one site and $200,000 on another. The difference is everything except the wall.
Site Access: The Hidden Variable
This is the cost driver that almost never appears in an online estimator and almost always determines whether a project is straightforward or expensive.
If a standard excavator can reach the wall, the work proceeds at machine pace. If it can't (because the wall is behind a house, at the bottom of a steep yard, or behind a fence with a 36-inch gate), everything that a machine would do in an hour takes a crew a day. The New Westminster project illustrates this exactly: the site had no machine access at all. Every cubic metre of excavated material was dug by hand, loaded into bins, and carried to the street. That single site constraint added $40,000 to a $125,000 job.
Before you get a quote, think about how a contractor would get equipment in. If the answer is "they can't," that needs to be in the conversation before pricing starts.
Drainage
Every structural retaining wall requires drainage. Water behind a wall creates hydrostatic pressure that the wall wasn't designed to resist. Over time, inadequate drainage is the single most common cause of retaining wall failure.
Proper drainage means crushed gravel backfill directly behind the wall, a perforated drain tile at the base, and a clear outlet. In Burnaby, the drain tile must connect to the City storm sewer system, which requires a separate plumbing permit. Drainage is a real cost component and is frequently omitted from landscaper quotes. If a quote doesn't mention drainage, ask specifically what's included.
Engineering and Permit Fees
Walls over the permit threshold in each municipality require a structural engineer. Engineering fees for a residential retaining wall typically run $2,000 to $6,000 or more depending on the complexity of the design and whether a geotechnical investigation is required. Permit fees are on top of this.
On a $20,000 wall, engineering and permitting might represent 15 to 20% of total cost. This is real money that doesn't appear on any surface of the finished wall, but it's what makes the wall legal, insurable, and safe.
Surcharge Loads
A surcharge load is anything sitting above the wall that adds weight to the soil being retained: a garage, a house foundation, a driveway. If there's a structure or paved surface above your wall, the wall must be designed for that load. This almost always triggers the engineer requirement regardless of wall height, and it significantly affects wall design and cost.
This is one of the most common scenarios on North Shore hillside lots: the wall retains the earth below a driveway. That wall is carrying vehicle loads. It needs to be designed for them.
My Wall Is Failing: Can It Be Fixed?
This is one of the most common questions we get, and the answer is almost always the same: no. Not in the way homeowners are hoping.
The typical sign of a failing retaining wall is that it's starting to lean. Once a wall begins to move from plumb, the structural integrity is compromised. The pressure behind the wall that caused the movement doesn't go away, and patching the face or adding drainage at that point doesn't address what's already happened. The wall needs to come down and be rebuilt properly.
What causes the lean in the first place? Walls lose strength gradually over time, through material deterioration, drainage failure, frost cycles, and the steady pressure of retained soil and water behind them. Eventually the pressure behind the wall overpowers it. On most failing walls we're called to assess, the drainage was never adequate to begin with.
There is one exception worth knowing about: on certain sites, it's possible to construct a shoring wall using shotcrete and anchors set back approximately 30 feet into the hillside. This stabilises the slope without demolishing the existing wall. It works in specific conditions and it is expensive, but sometimes it's the only option, particularly on sites where demolition and rebuild would be disruptive or structurally complicated.
The practical implication for homeowners: if your wall is visibly leaning, don't wait. The longer a failing wall sits, the more movement occurs, and the more complex and expensive the remediation becomes. Get a structural assessment before the problem compounds.
One more note: in most municipalities, structural repairs to an existing wall require a permit, the same as new construction. Check the permit requirements before assuming repair work is exempt.
What It Actually Cost: Two Roka Projects
Project 1: Pitt Meadows
The wall: Pressure treated timber, 25 linear feet, approximately 3 feet high on average.
The scope: No permit required at this height in Pitt Meadows. No drainage. At 3 feet with no significant surcharge above, this was a straightforward install.
Total cost: $10,000
This is about as simple as a retaining wall project gets. Short run, modest height, timber construction, good access. It's a useful reference point for what the low end of the market looks like, and for understanding how quickly cost escalates once any of those variables change.
Project 2: New Westminster
This is the project that most clearly illustrates why retaining walls cost what they cost. The wall itself, 123 feet of poured concrete with an average height of 4 feet, accounts for less than half the total project cost.
The wall:
123.71 linear feet of poured concrete
Variable height: approximately 2 feet at the low end, 6 feet at the high end, 4 feet average
Wall face area: approximately 495 square feet
Blended cost per square foot of wall face: approximately $253
The cost breakdown:
| Line item | Cost |
|---|---|
| Demolition and disposal | ~$40,000 |
| Concrete footings and walls (forming and pouring) | ~$60,000 |
| Permitting, surveys, drainage, general conditions, and other | ~$25,000 |
| Total | ~$125,000 |
Why demolition cost $40,000:
The existing wall had to come out before the new one could go in. On most sites, that's excavator work. On this site, no machine could reach the space. Every cubic metre of concrete and soil was broken up by hand, loaded into bins, and walked out to the street. That is slow, labour-intensive work, and $40,000 reflects what it actually costs.
The concrete wall and footings, the permanent structural work, cost $60,000. Permitting, the engineer, surveys, drainage, general conditions, and incidentals made up the remaining $25,000.
If someone had quoted this project based on wall dimensions alone (123 feet of 4-foot poured concrete) the material and forming estimate might have looked reasonable. The site access problem is invisible on paper. It is only visible when someone walks the site.
Permit Requirements by Municipality
This is the section no one else publishes accurately. Most "Vancouver retaining wall permit" content either repeats a single number without citing a source or conflates rules across municipalities that have meaningfully different requirements.
For a broader overview of when renovation projects require permits in Greater Vancouver, see our guide on when you need a permit for a home renovation.
What follows is sourced from the primary municipal documents (bylaws, zoning guides, and construction regulation bylaws) for five Greater Vancouver municipalities. The rules are confirmed as of the dates noted for each source. Regulations change; always confirm current requirements with the relevant municipality before starting work.
One important note before the specifics: in most municipalities, a permit is required not just for construction of a new wall. It is also required for structural repairs to an existing wall. If your current wall is failing and needs significant remediation, check the permit requirement before assuming repair work is exempt.
City of Burnaby
Permit threshold: Any wall exceeding 4 feet (1.2m) in height. Also required for terraced walls where any wall in the group exceeds 4 feet, walls terraced at a ratio steeper than 1:1, or any wall where the Building Inspector determines site conditions warrant it, regardless of height.
Maximum height: 4 feet (1.2m). Burnaby's height cap equals the permit threshold. There is no class of permitted wall over 4 feet.
Engineer requirement: Mandatory for all permitted walls without exception. Two sets of signed and sealed structural drawings, a Letter of Assurance (Schedule B), Schedule F, and potentially a geotechnical report are required as part of the permit application.
Drainage: Drain tile behind the wall must connect to the City storm sewer system. A separate plumbing permit is required for this connection.
Terracing rules (the most explicit of any municipality reviewed): The horizontal distance between two adjacent walls cannot be less than the height of the taller wall. A 4-foot wall requires a minimum 4-foot terrace before the next wall. Terraces must be relatively flat and landscaped. The intent is clear: homeowners cannot stack multiple short walls to avoid the 4-foot permit threshold. If any wall in a terraced group exceeds 1.2m, a permit is required for all of them.
Corner lot sightlines: On corner lots, the combined height of fence and retaining wall is limited to 3 feet 3 inches (1.0m) within 30 feet (9.0m) of a street or street corner intersection, and within 20 feet (6.0m) of a lane corner. At the intersection of two lanes, no structure, fence, retaining wall, hedge, or vegetation is permitted within the triangular area 10 feet (3.0m) from the intersection point.
Pool walls: Burnaby classifies above-ground pool walls as retaining walls. They fall under the same permit, height, and engineer requirements as any other retaining wall.
Fence above retaining wall: Where a fence is located above a retaining wall, the fence must be constructed of materials that are visually dissimilar to the retaining wall.
Property line and boulevard: Retaining walls cannot be constructed on City property, rights-of-way, or easements. Only a BC Land Surveyor can confirm the property line. This is the owner's responsibility and cost.
Source: City of Burnaby, Fences and Retaining Walls Informational Guide, revised October 27, 2022; Zoning Bylaw 4742, Section 6.14.1.
Fences and Retaining Walls Informational Guide — City of Burnaby (PDF)
Retaining Walls Bulletin — City of Burnaby (PDF)
District of North Vancouver
Permit threshold: Any wall exceeding 3 feet (0.9m) in height. This is the lowest permit threshold of any municipality covered in this post.
Engineer requirement: Required at the same threshold as the permit. Walls over 3 feet need engineer-produced drawings as part of the permit application. There is no separate higher threshold for the engineer requirement.
The height envelope, Section 409(3): DNV uses an inward-projecting angle system rather than a flat height limit. The outermost wall face cannot exceed 3 feet (0.9m) above natural or finished grade. Additional wall height is permitted further inward from the property line, governed by a 35° angle projected from an 8-foot reference point. On the downslope side of the lot, there is no hard height limit once you're sufficiently inward.
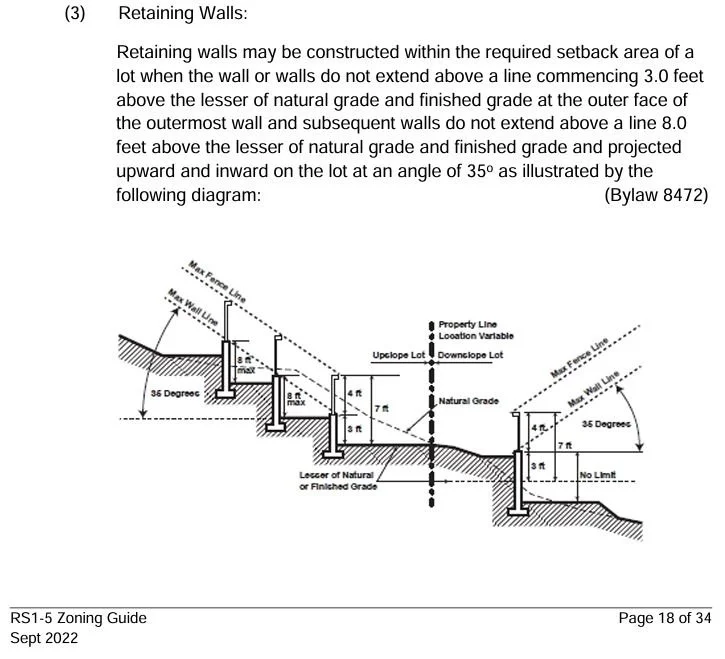
District of North Vancouver, RS1-5 Single Family Residential Zones Information Handout, Section 409(3), September 2022. View source (PDF).
This system means you can build taller walls in DNV, but only if you have the lot depth to pull them back from the property line. A wall tight to the property line is limited to 3 feet.
Development permit areas: Many DNV properties fall within designated Development Permit Areas: Slope Hazard, Creek Hazard, Streamside Protection, or Wildfire Hazard. A development permit may be required before a building permit can be issued. Check the DNV online map at geoweb.dnv.org before starting any permit application.
Boulevard: No permanent structures permitted in the District Boulevard. Any proposed changes to the boulevard, including retaining walls, require an encroachment agreement.
Neighbour consent: For walls on public property, DNV requires consultation with and comments from contiguous property owners and any significantly impacted neighbours before approval. If concerns cannot be resolved, the matter goes to Council.
Fence on top of retaining wall: A fence placed on a retaining wall within the setback area cannot extend more than 4 feet (1.2m) above the maximum allowable retaining wall height at that point.
Source: District of North Vancouver, RS1-5 Single Family Residential Zones Information Handout, Section 409(3), September 2022; Administrative Policy Manual Document No. 197254.
RS1-5 Single Family Residential Zones Information Handout, Section 409(3) (PDF)
Build a deck, fence or retaining wall — DNV
DNV GeoWeb — Development Permit Area map
City of North Vancouver
Permit threshold: Any wall where the differential height (the difference in finished grade on either side) is 4 feet (1.2m) or greater.
The critical distinction: CNV measures differential height, not exposed face height. On a sloped lot, these produce different results. A wall can have 5 feet of differential but only 3.5 feet of exposed face. That wall needs a permit in CNV. A contractor quoting based on exposed face height alone may not flag the permit requirement, and the homeowner ends up with an unpermitted wall.
Maximum height, Zoning Bylaw 6700: The zoning bylaw imposes a hard cap of 3 feet 3 inches (1.0m) on wall height at any point. This is measured as the vertical distance between the lower ground level on either side and the top of the wall. This is the most restrictive height cap of any municipality reviewed.
Two bylaws, two numbers: CNV's Construction Bylaw triggers permit review at 4-foot differential, but the Zoning Bylaw caps wall height at 3 feet 3 inches. In practice: you cannot legally build above 1.0m regardless of the permit threshold. The construction bylaw governs when you need approval; the zoning bylaw governs what you can build.
Engineer requirement: Required at the 4-foot differential threshold, same as the permit trigger.
Wall spacing: Walls must be at least 3 feet 3 inches (1.0m) apart from any other wall on the same lot, adjacent lot, or right-of-way. Exception: if the difference in top-of-wall elevations between two adjacent walls is less than 1 foot (0.3m), the spacing requirement does not apply.
Fence on top of retaining wall: Any portion of a fence within 1 foot 8 inches (0.5m) of a retaining wall cannot exceed 4 feet (1.2m) in height, measured from the top of the retaining wall.
Source: City of North Vancouver, Construction Regulation Bylaw No. 7390 (consolidated July 7, 2025), Sections 6.11(f) and 8.6.1(b); Zoning Bylaw No. 6700, Section 580(4), consolidated March 2, 2026.
Construction Regulation Bylaw No. 7390 (PDF)
District of West Vancouver
Permit threshold: Any wall exceeding 1.2m (4 feet) in exposed height. West Vancouver's Building Bylaw is explicit: "No person may Construct, or structurally repair, a Retaining Wall without a Building Permit." A Retaining Wall is defined as any structure exceeding 1.2m that holds or retains soil.
Maximum height: 8 feet (2.4m) exposed face. This is the highest of any municipality reviewed.
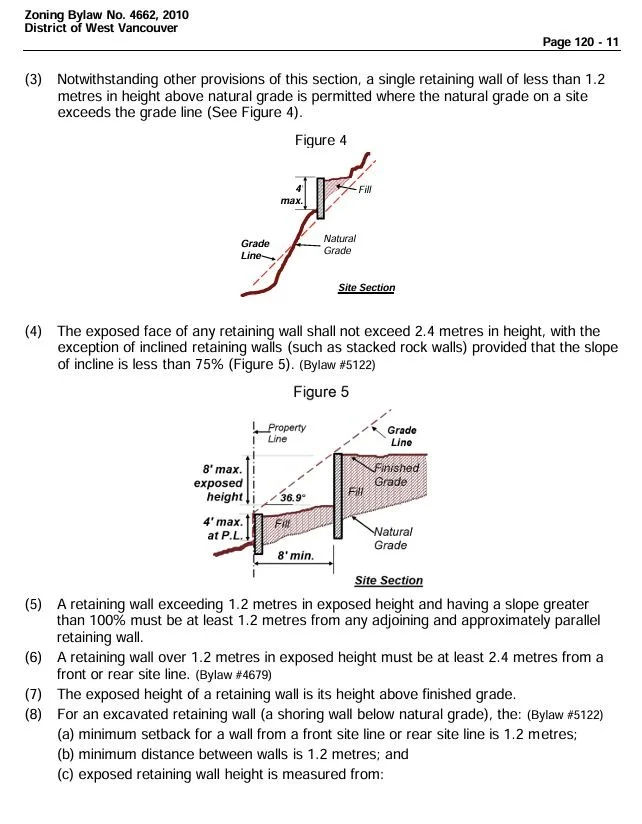
Source: District of West Vancouver, Zoning Bylaw No. 4662, Section 120.22, Figures 4 and 5. View source (PDF).
Engineer requirement: Required for walls exceeding 1.2m in exposed height, walls exceeding a 2:1 horizontal-to-vertical slope, or two or more parallel walls spaced closer than 2:1.
The grade line envelope, West Vancouver's unique complexity: West Vancouver uses a cascading system based on a "retaining wall grade line," an imaginary line drawn inward from the property line that limits how high a wall can be at any given distance from the boundary.
At the property line, the wall is limited to 4 feet (1.2m). The permitted height increases as you move inward. The envelope rises at different angles depending on which boundary you're near:
Front or flanking side boundary: rises 4 feet (1.2m) vertically from natural grade at the property line, then slopes inward at a 26.6° angle (50% gradient)
Rear and other side boundaries: rises 4 feet (1.2m) vertically, then slopes inward at a steeper 36.9° angle (75% gradient)
Waterfront boundary: the most restrictive scenario. No 4-foot rise at the boundary; the envelope slopes inward at 45° (100% gradient) immediately from natural grade
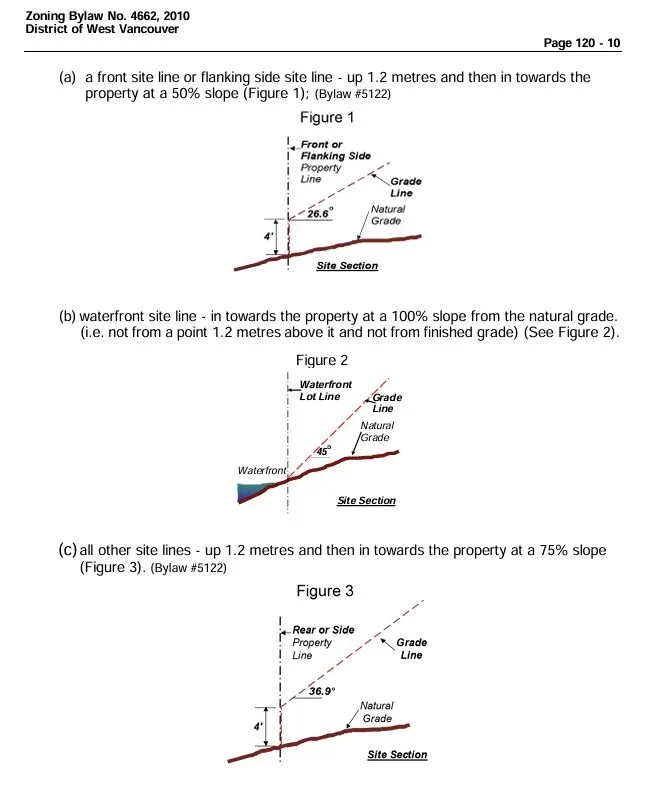
Source: District of West Vancouver, Zoning Bylaw No. 4662, Section 120.22, Figures 1, 2, and 3. View source (PDF).
The practical implication: the taller you want to build, the further back from the property line the wall needs to be. A wall right on the front property line is limited to 4 feet. A wall 10 feet back may be permitted at 6 or 7 feet depending on the grade line calculation. A wall 20 feet back may reach the 8-foot maximum.
This system is unique to West Vancouver and catches homeowners who assume "under 8 feet is fine anywhere on the lot." Where the wall sits on the property matters as much as how tall it is.
Exemptions for sequences of short walls: A sequence of walls is exempt from the bylaw if all individual walls are under 1.2m AND the walls are spaced greater than 2:1 horizontal-to-vertical. If the spacing is tighter than that ratio, the sequence is treated as a single structure.
Setbacks from property lines: Any wall exceeding 4 feet (1.2m) in exposed height must be set back at least 8 feet (2.4m) from a front or rear property line. Vertical or near-vertical walls over 4 feet must also be at least 4 feet (1.2m) from any parallel adjacent wall. Walls under 4 feet must be at least 2 feet (0.6m) apart from each other.
Excavated retaining walls: Walls constructed below natural grade (shoring walls for basement or driveway excavations) have their own rules. Minimum setback from a front or rear property line is 4 feet (1.2m). Minimum distance between two excavated walls is 4 feet (1.2m). The combined exposed height of an excavated retaining wall and any integral base structure cannot exceed 10 feet (3.0m) from finished grade.
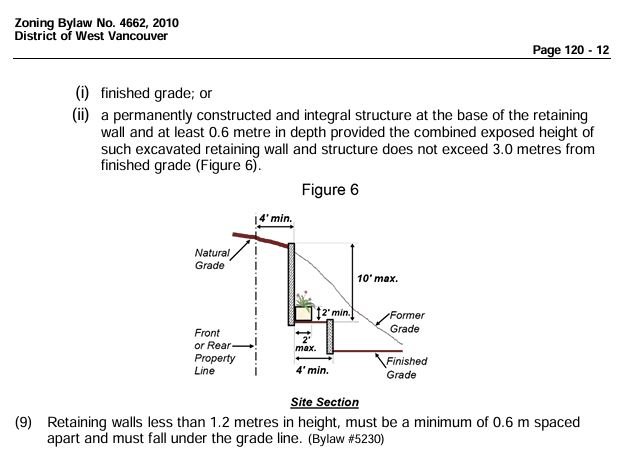
Source: District of West Vancouver, Zoning Bylaw No. 4662, Section 120.22, Figure 6. View source (PDF).
Source: District of West Vancouver, Building Bylaw No. 5340, 2025, Sections 2.1, 4.3(d), 9.3(g), 19.1. Effective June 23, 2025. Zoning Bylaw No. 4662, Section 120.22.
Zoning Bylaw No. 4662, Section 120.22 — Grade Line Diagrams (PDF)
Building Bylaw No. 5340, 2025 (PDF)
Land Development FAQ — Fences and Retaining Walls
City of Vancouver
Permit threshold: Any retaining structure exceeding 1.2m (4 feet) in height. The Vancouver Building By-law defines "Building" to include "any retaining structures greater than 1.2 m in height." A wall over this threshold is treated as a Building under the full permit framework.
Engineer requirement: Required for walls supporting driveways or structures above. Consistent with BC Building Code Part 9 requirements.
Fence-on-wall rule, Zoning and Development By-law, Section 10.10.5: Where a fence is built above a common boundary retaining wall, or within 1.0m of one, the maximum permitted fence height is reduced by half the height of the retaining wall. A 1.2m (4-foot) retaining wall with a standard 1.8m (6-foot) fence creates a combined 3.0m barrier, which may require Director of Planning approval.
Applicable bylaw: New permit applications from September 15, 2025 onward are governed by the Vancouver Building By-law 2025 (VBBL 2025, By-law No. 14343). Applications submitted before that date, and in-stream projects, continue under the VBBL 2019 (By-law No. 12511). The retaining wall definition and permit threshold are identical in both versions.
Source: Vancouver Building By-law 2019, By-law No. 12511, Division A, Section 1.4.1.2; Vancouver Building By-law 2025, By-law No. 14343, Division B, Part 1, Section 1.2.1; Vancouver Zoning and Development By-law No. 3575 (consolidated June 30, 2026), Section 10.10.5.
Vancouver Building By-law 2025, Volume 1 (PDF)
Zoning and Development By-law No. 3575, Section 10 (PDF)
Building a fence or wall — City of Vancouver
Quick-Reference Comparison
| West Vancouver | Dist. of N. Van | City of N. Van | Vancouver | Burnaby | |
|---|---|---|---|---|---|
| Permit trigger | >4 ft (1.2m) exposed | >3 ft (0.9m) | ≥4 ft (1.2m) differential | >4 ft (1.2m) | >4 ft (1.2m) + terracing |
| Max height | 8 ft (2.4m) | Envelope-based | 3 ft 3 in (1.0m) | Not confirmed | 4 ft (1.2m) |
| Engineer required | Yes, at 1.2m | Yes, at 0.9m | Yes, at 1.2m differential | Yes (structures / driveways) | Yes, all permitted walls |
| Key complexity | Grade line envelope | 35° inward angle + DPAs | Differential measurement | Fence-on-wall reduction rule | Strict 1:1 terracing ratio |
When You Need a Structural Engineer
The permit threshold in your municipality is where engineering becomes legally required. But there are conditions where you need an engineer regardless of wall height:
Surcharge loads. Any wall retaining soil below a structure (house foundation, garage, driveway) must be designed for the load above it. Engineers call this a surcharge. It significantly affects wall design, footing depth, and cost. This is the scenario that catches the most homeowners off guard, because the wall looks like a landscaping problem but it's carrying structural loads.
Variable or unknown soil conditions. If the soil behind your wall is variable, soft, contains fill, or has a history of movement, a geotechnical investigation is required before a wall can be designed. This is common on North Shore lots with a history of significant grade change or excavation.
Development permit areas. In the District of North Vancouver, properties in Slope Hazard, Creek Hazard, or Streamside Protection Development Permit Areas require a development permit before a building permit, and that process involves a geotechnical engineer. Check the DNV online map at geoweb.dnv.org before assuming a permit application is straightforward.
Tiered walls. In Burnaby, if any wall in a terraced group exceeds 1.2m, a permit and engineer are required for all walls in the group. In other municipalities, tiered walls near the permit threshold should be reviewed: the intent of the terracing rules is to prevent circumventing height limits through sequencing.
What an engineer provides:
Signed and sealed structural drawings required for the permit application
Design for wall section, footing depth, drainage, and any reinforcing
Field review during construction to confirm the wall is built to specification
Letter of Assurance (required by Burnaby; standard practice elsewhere)
Geotechnical report where site conditions require it
The standard for what a professional engineer must consider and document on a retaining wall project in BC is set by the Engineers and Geoscientists BC (EGBC) Professional Practice Guidelines for Retaining Wall Design (https://www.egbc.ca/Practice-Resources/Professional-Practice-Guidelines). These guidelines govern structural design, soil stability analysis, drainage design, and documentation requirements. Burnaby explicitly references them in their permit documentation. They apply across all five municipalities covered in this post.
Engineering fees for a residential retaining wall in Greater Vancouver typically run $2,000 to $6,000 or more, depending on the complexity of the design and whether a geotechnical investigation is required. On engineered projects, the engineer is not optional and the fee should be included in every honest estimate.
The Property Line Question
This comes up on almost every project involving a wall near a shared boundary: whose wall is it, who pays to build it, and who pays to fix it when it fails?
The short version: municipal bylaws in all five municipalities explicitly state they do not govern neighbour disputes over retaining walls. These are civil matters. The City will enforce its own bylaws on a complaint basis (unpermitted walls, walls that violate setbacks) but it will not adjudicate who should pay for a shared wall.
The legal framework in BC: British Columbia does not have a statute specifically governing retaining wall cost-sharing between fee-simple neighbours. The relevant principles are:
A wall entirely on one owner's property is that owner's responsibility
A wall on the property line is technically a shared structure, but cost-sharing is a civil negotiation
If the uphill neighbour's soil is being retained by a wall on the downhill neighbour's property, the courts have generally held that the uphill owner cannot demand the downhill owner maintain the wall, but if the downhill owner allows the wall to fail, they may be liable for resulting damage to the uphill property
Why neighbour access matters for cost: On projects where the wall sits near or on a shared boundary, one of the most practical questions is whether the neighbour will allow access to their side of the property line during construction. If they will, the wall can typically be built right at the property line. The contractor can work from both sides, set forms or blocks precisely, and backfill properly. If access is refused, everything has to be done from the homeowner's side only. That means the wall either has to be set back further into the homeowner's property to allow room to work, or the construction method changes to accommodate the constraint. Both outcomes cost more and in some cases reduce the amount of grade the wall can retain. A cooperative neighbour isn't just good for the relationship. It has a direct impact on what the project costs and what can actually be built.
Practical guidance:
Before any wall work near a property line, hire a BC Land Surveyor to confirm the line. All five municipalities confirm this is the owner's responsibility. Do not assume the line is where you think it is.
Notify adjacent owners before work starts. In DNV, written consultation is explicitly required for public property walls. For private property, it is good practice and avoids disputes after the fact.
If the wall will retain the neighbour's soil, document any agreement in writing.
If a dispute arises, the right person to call is a BC real property lawyer, not the municipality and not your contractor.
How to Prepare for a Quote
When a contractor comes to assess your wall, the more information you can provide, the more accurate the estimate will be. Here's what to have ready:
Know your property line. If the wall is anywhere near a boundary, have the line confirmed by a BC Land Surveyor before the assessment. An accurate property line prevents scope disputes and ensures the wall is designed and positioned correctly.
Know what's above the wall. Is there a structure above (garage, house, deck)? Is there a driveway? Is there significant landscaping or tree mass? Anything sitting above a retaining wall adds load to the design. Tell the contractor before they quote.
Think about access. How would a contractor get equipment to the wall? Is there a gate? How wide is it? Is there a soft or narrow section of yard between the street and the wall location? Access is a major cost driver and the contractor needs to see it in person.
Know your municipality. Different rules apply in different municipalities, as the comparison table above shows. Your contractor should know the relevant rules, but knowing which municipality you're in and whether there's an obvious permit trigger helps get the conversation started in the right place.
Ask specifically about drainage. Any quote for a structural retaining wall should include drainage, gravel backfill and drain tile at minimum. If a quote doesn't mention drainage, ask what's included. A wall without proper drainage will fail earlier than it should.
Ask about engineering. If your wall is near or over the permit threshold, ask whether the quote includes engineering. A quote that doesn't include engineering fees for a wall that clearly needs an engineer is not complete.
Working With Roka
Roka Projects is a premium residential renovation and construction contractor based in Greater Vancouver. We build retaining walls as a standalone service and as part of larger residential renovation projects. Our work is open-book: we use a cost-plus model, which means you see every line item in the project budget and pay a flat management fee on top. No hidden markups.
Gord Green, our owner, has been building in Greater Vancouver for over 34 years and has direct installation experience across all wall types covered in this post, including geogrid-reinforced MSE walls, engineered tie-back systems, and complex multi-wall projects on North Shore hillside lots.
If you have a retaining wall that needs to be assessed, repaired, or replaced, we're happy to walk the site and give you an honest read on what the project involves.
All regulatory information in this post is sourced from primary municipal documents (bylaws, zoning guides, and construction regulation bylaws) as noted throughout. Regulations change. Always confirm current requirements directly with the relevant municipality before commencing work. This post was written by Gord Green and reflects his direct field experience in Greater Vancouver residential construction.