
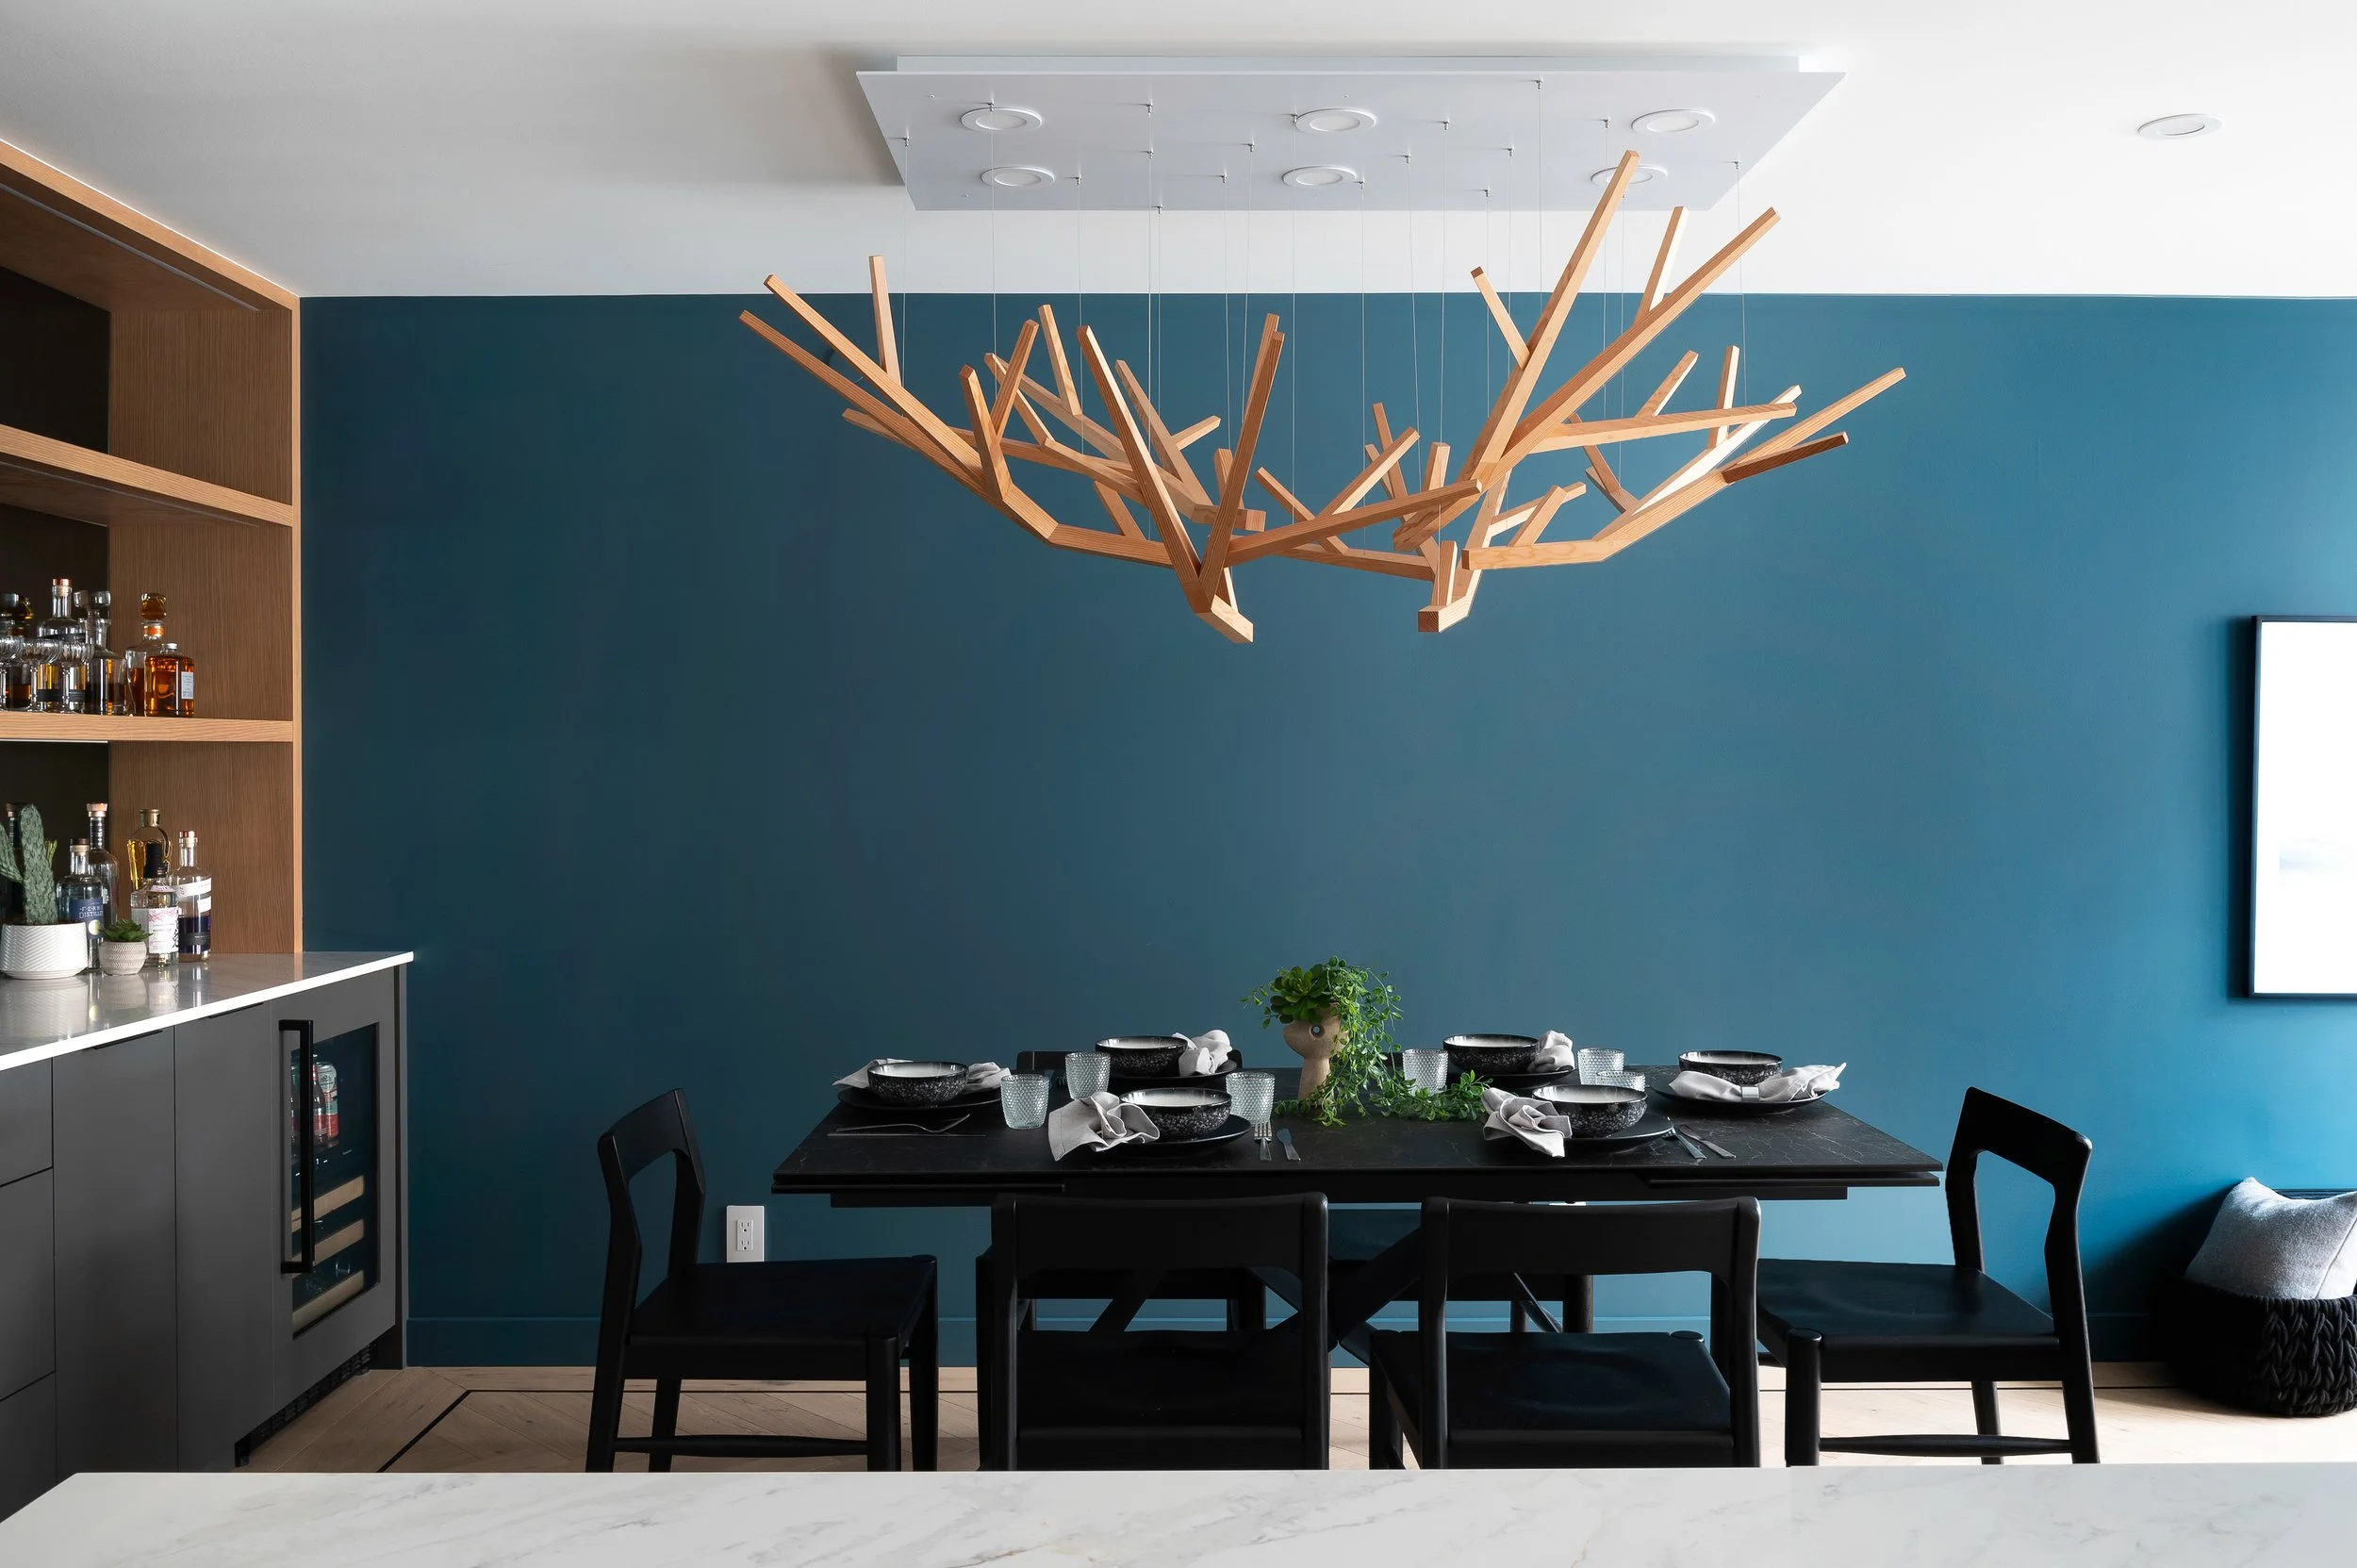
The finished Downtown Vancouver townhouse, planned and priced before any design work began. See the full project.
You have the keys. You know you want to change the house: the kitchen is in the wrong place, the basement is unfinished, or the layout doesn’t work for how you live.
Start with a renovation contractor before you pay for design. Design decisions are cost decisions, and it’s easier to make them when you know what each one costs to build. Homeowners lose the most time and money when they spend months designing a renovation, then find out it costs far more than they planned. A renovation is an investment in your home, both in how you live in it and in its overall value.
A Newly Purchased Townhouse, Start to Finish
The owners of a Downtown Vancouver townhouse bought it knowing they wanted to change almost everything. They brought us in before design started, so every goal was priced as it was drawn.
Several of their goals had a construction cost that wasn’t obvious from the floor plan:
Higher kitchen ceilings. The plumbing, sprinklers and main water lines ran through the existing dropped ceiling. All of it had to be rerouted.
Removing the powder room. The City had designated that space as a required 40 sq ft storage room. The storage had to be relocated before the powder room could go.
A powered kitchen island. The concrete slab had no electrical at that location. A structural engineer confirmed it was feasible, a scanning crew found safe channels, and we cut the concrete, ran power and finished it with a steel plate.
Then the walls opened. A leak from the building envelope had rusted the steel studs, the electrical panel was undersized, and the plumbing and electrical needed extensive replacement.
The project took about nine months of construction and cost approximately $374,000 at completion (1,250 sq ft).
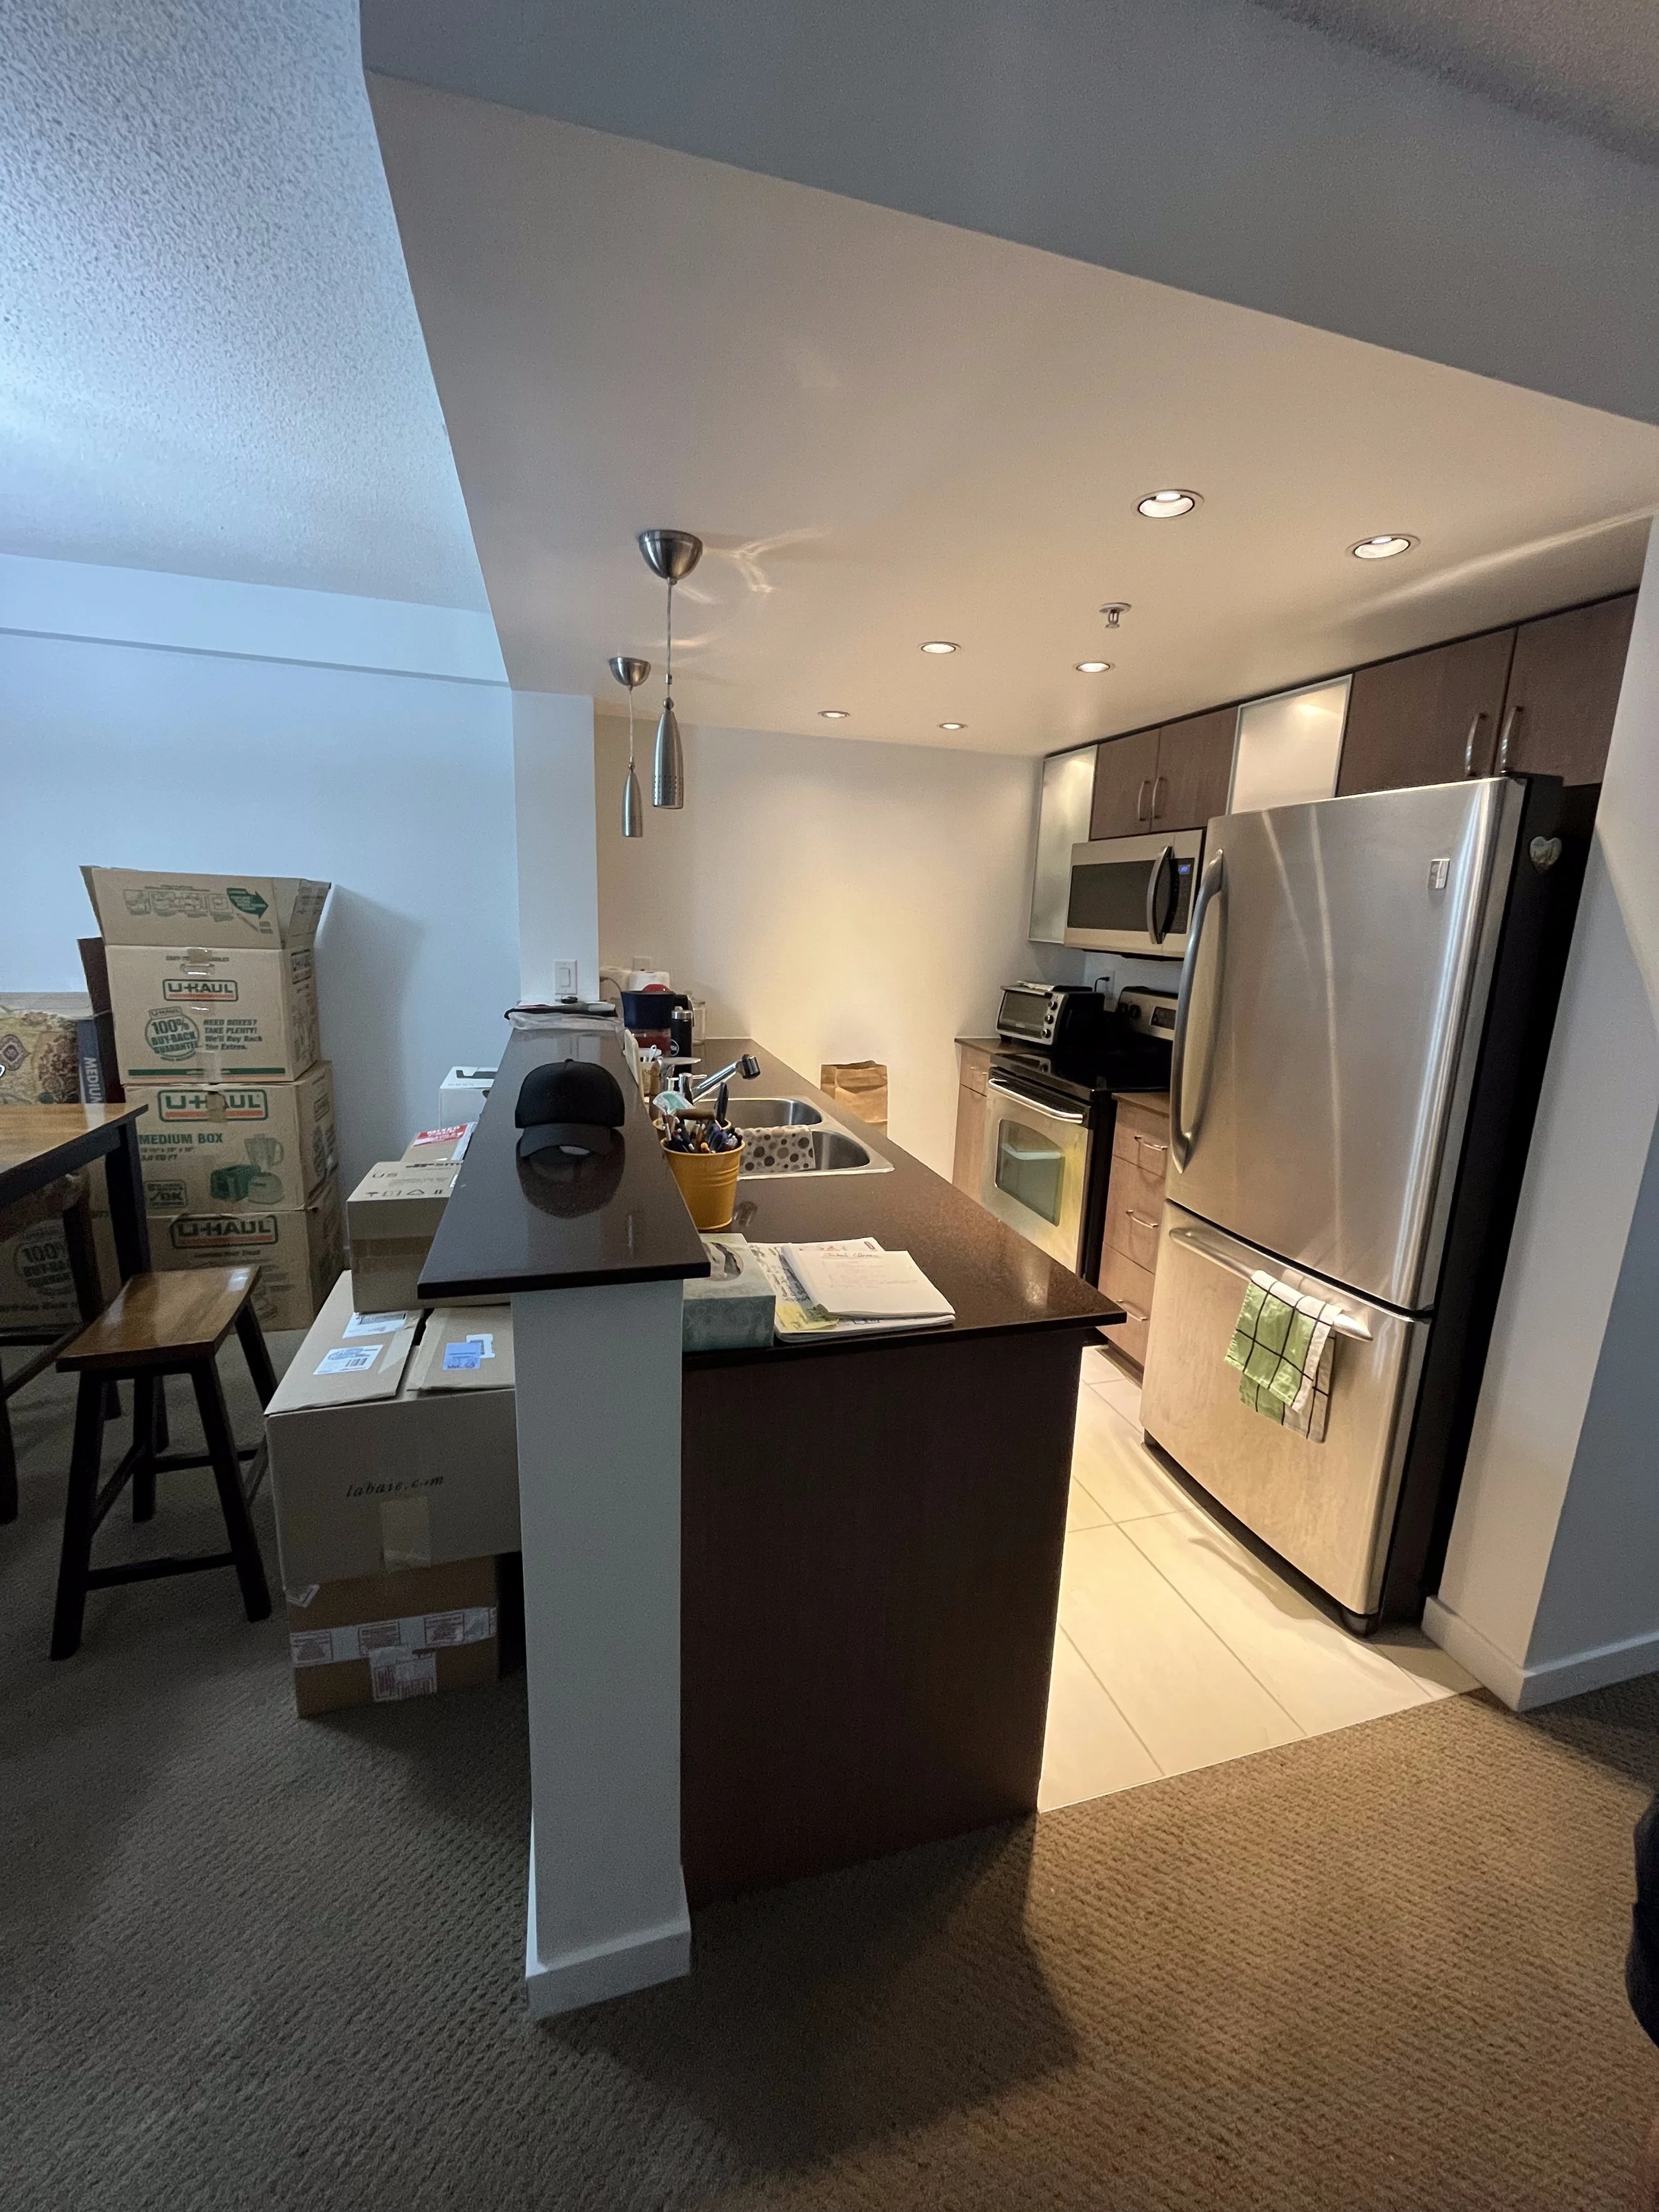
Before: the townhouse as the owners bought it. See the full project.
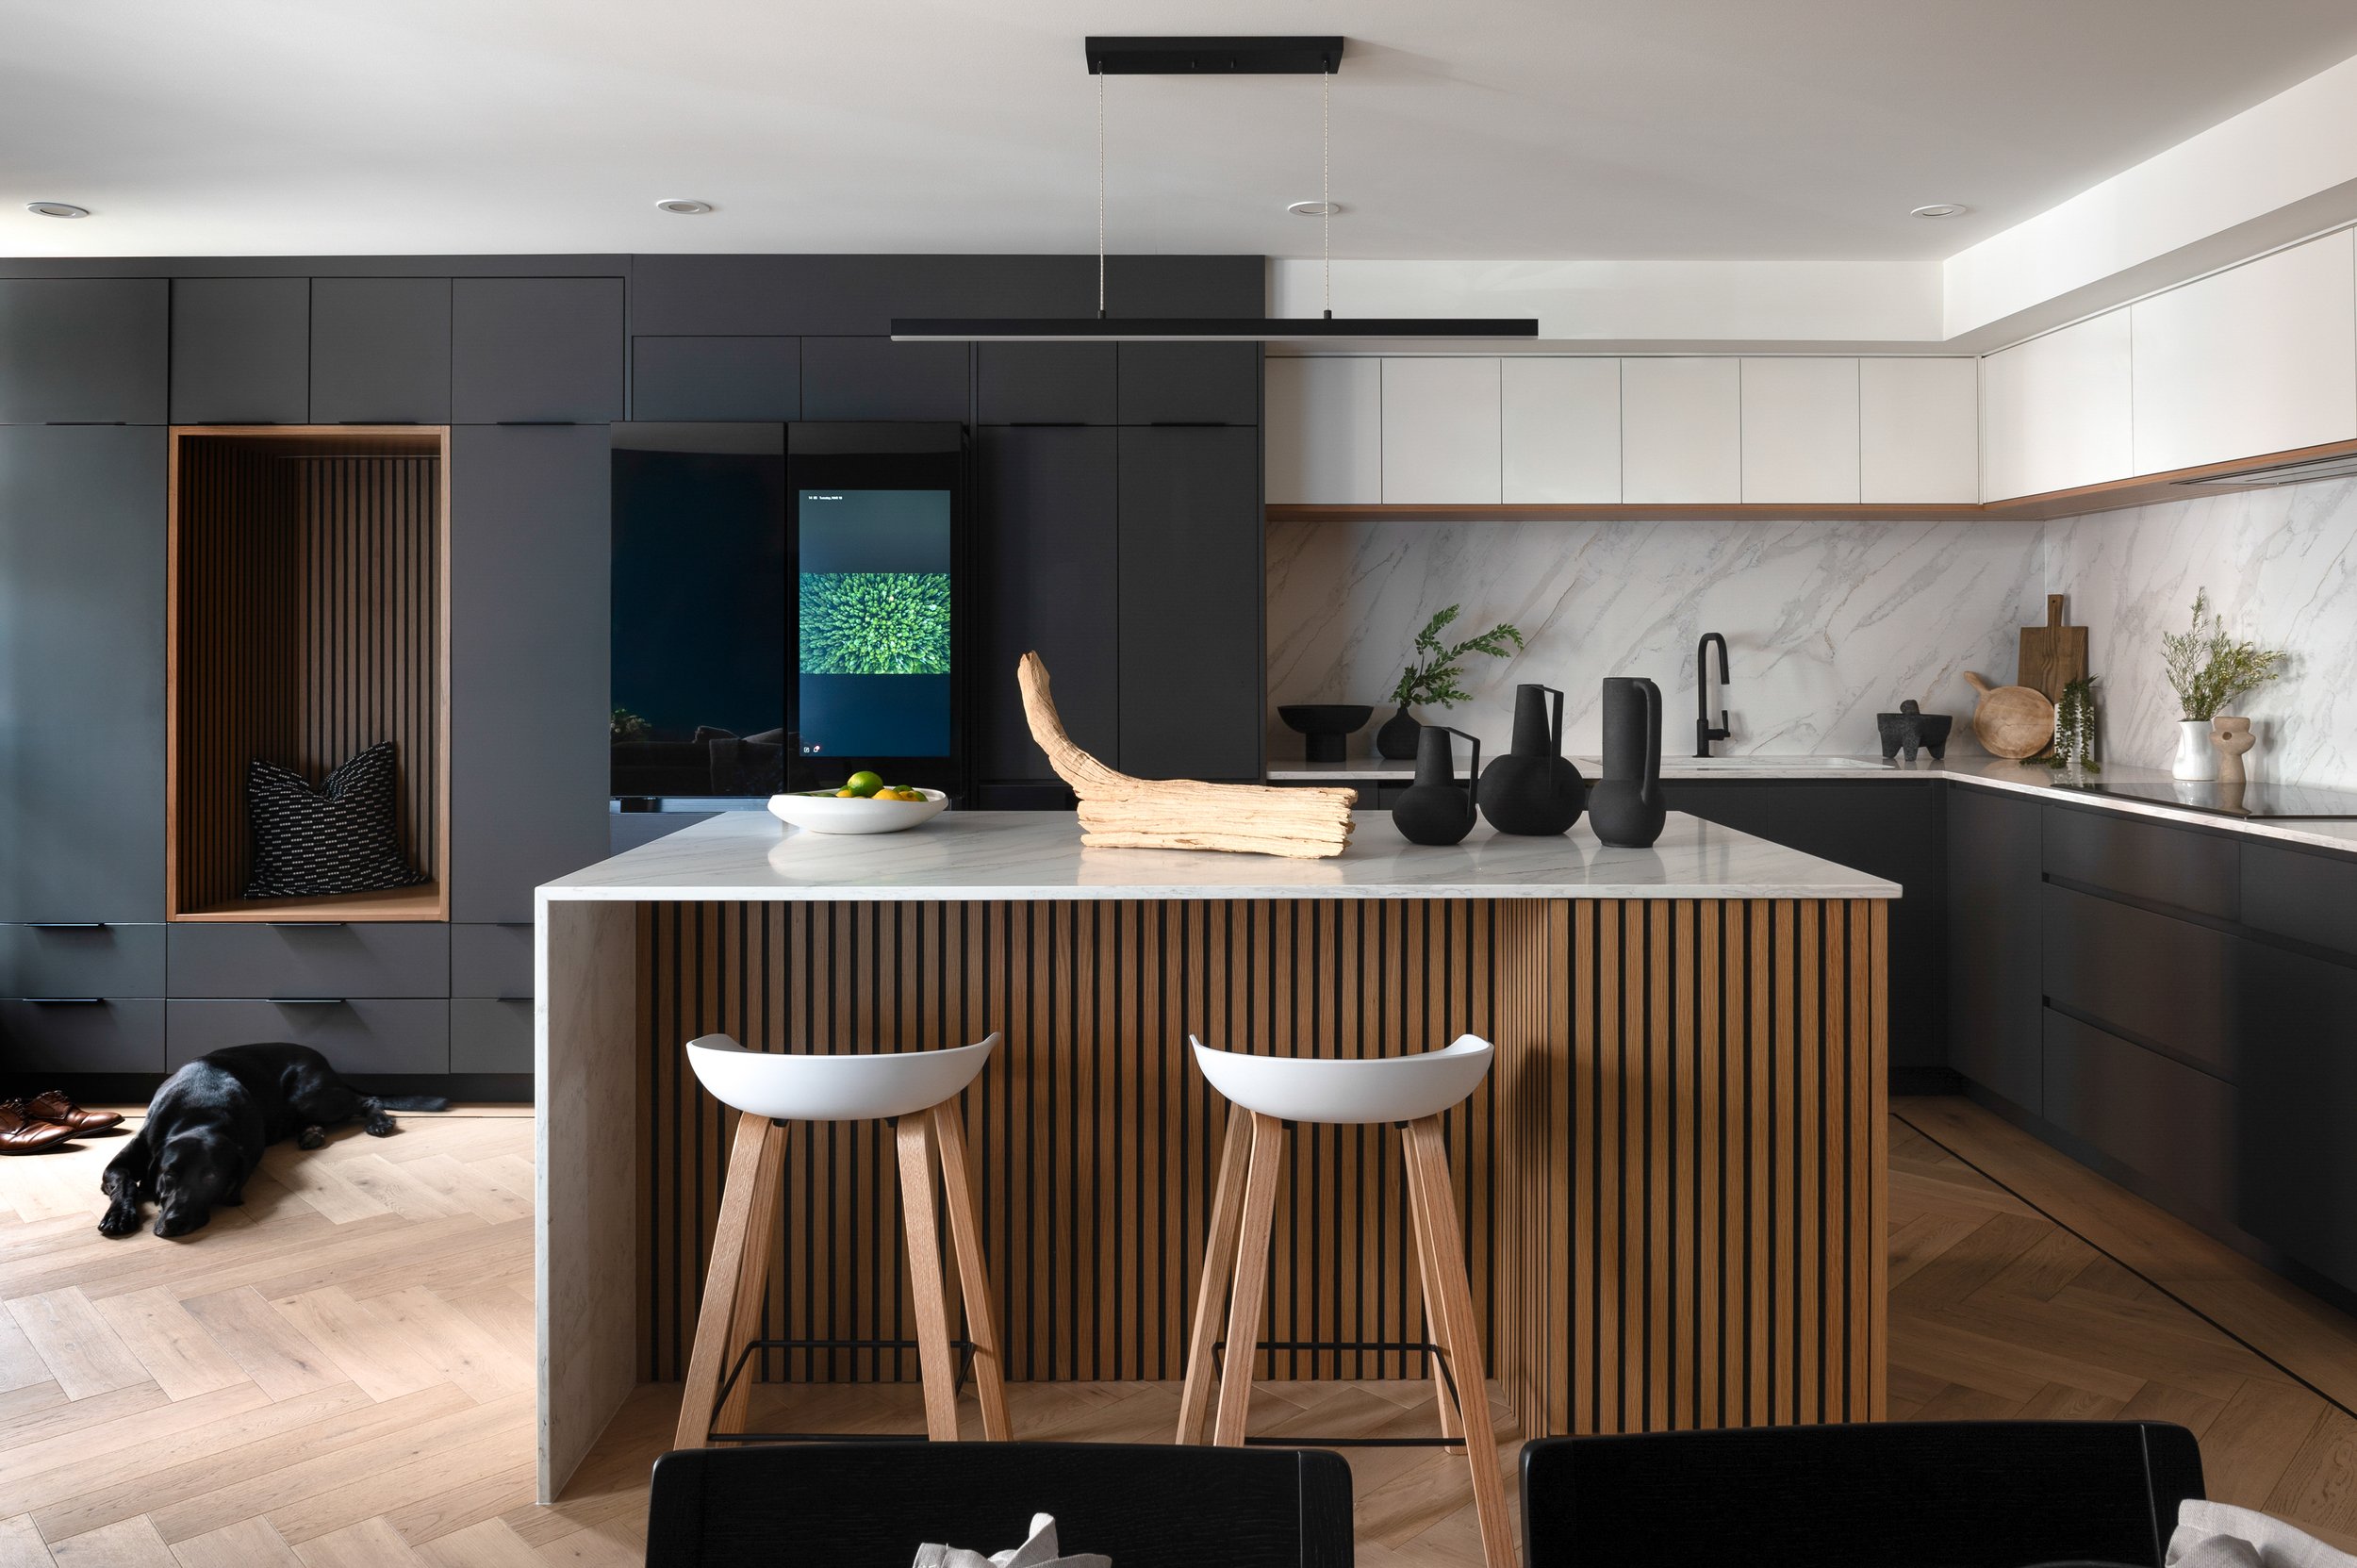
After: the kitchen and island, with every goal costed as it was drawn. See the full project.
The finished townhouse was a finalist in two of BC’s main industry awards: the 2026 Georgie Awards (Best Condo Residential Renovation, $275,000 to $475,000) and the 2026 HAVAN Awards for Housing Excellence (Best Renovation, Under $400,000).
The lesson for a new owner: because we were involved before design, the cost of each design goal was known before it was locked in. The concealed conditions couldn’t be known until the walls opened, which is why the budget needs room for both.
Should You Renovate Before You Move In?
If you can, yes. An empty house is faster and usually cheaper to renovate. Trades work full days without packing up, nothing needs protecting around your furniture, and the work can be sequenced for efficiency instead of around where you sleep and cook.
The catch is timing. Planning a substantial renovation takes months before anyone picks up a tool: design, engineering, selections, pricing and permits. If you call a contractor the week you take possession, construction won’t start that week. Carrying a mortgage on an empty house while you wait for permits is expensive.
You have three realistic options:
Plan before possession, renovate before moving in. This is the best outcome, and it only works if planning starts during the purchase, ideally before subjects come off. Our guide to buying a home to renovate covers that stage.
Move in, plan, then move out for construction. This is common for whole-home renovations. You live in the house while it’s designed and permitted, then move out for the build.
Live in it during construction. This works for smaller or phased scopes. Without a kitchen, plan on several weeks of takeout or a temporary kitchen. With one bathroom under construction, you need another that works.
For a sense of how long construction runs, here are completed projects of different sizes:
Kitsilano condo kitchen and bathroom: six weeks
East Vancouver kitchen and 2½ bathrooms: two and a half months
Downtown Vancouver townhouse, full interior: nine months
Burnaby whole-home renovation: nine months
Those are construction periods only. Design, engineering and permits come first, and how long that takes varies a lot by municipality and scope. Our permit guide covers the differences. If you want to renovate soon after possession, start the conversation as early as you can.
Step 1: A Conversation and a Site Visit
The first conversation is about what you want to change, what isn’t working, your approximate budget and when you’d like it done. You don’t need drawings or a scope of work. A general idea of what you’d like and what you’re comfortable spending is enough.
If the project is a fit, we visit the house and walk through it with you. We look at the things that decide cost: which walls are structural, where plumbing and drainage can go, the capacity and condition of the electrical and mechanical systems, signs of previous renovations and whether your plans trigger permits or zoning limits. Our pre-purchase guide covers each of these in detail.
We’re also looking for cheaper ways to get what you want. Sometimes a smaller structural opening, or keeping the plumbing close to where it already is, gets you most of the result for much less. We’ll tell you when that’s the case.
Step 2: A Preliminary Budget Before You Commit to Design
If the project is a fit after the site visit, we put together a preliminary budget. Everything in it is a range, based on your goals, the visible conditions and comparable projects we’ve completed. Many details are still unknown at this point. We may know you want a new kitchen, but not the cabinetry, the appliances or how far the plumbing has to move.
Finishes are priced as ranges too, so you see what different levels of finish could cost before any design work starts, instead of a single figure to react to.
The preliminary budget answers one question: is what you’re imagining in line with what you’re prepared to spend? If your goals point to $350,000 and your budget is $150,000, you should find that out now, not after paying for drawings. Then we can talk about reducing the scope, phasing the work or dropping some pieces.
Don’t plan the renovation around every dollar you have available. Keep some back for conditions found once the walls are open.
Our renovation cost guide shows what real projects cost per square foot, with the projects behind each range.
Step 3: Design Development
Once you’re comfortable with the preliminary scope and budget, you can sign a Design Development Agreement with us. It’s a paid phase: we coordinate the design team and the permitting, and we develop the budget alongside the drawings. The drawings are yours, whether or not you build with us.
Depending on the renovation, the team may include an interior designer, an architect, a structural engineer and other consultants. We’ll introduce you to the architects and designers we work with, and you choose the one who fits. If you already have a designer or architect, we work with them.
When your plans involve structural changes, we bring in a structural engineer we work with to evaluate the bones of the house and what’s possible.
How the budget gets more accurate during design
A contractor can’t give an accurate price for a renovation that hasn’t been designed. During design development, the preliminary ranges get replaced with real numbers:
We price what the designer specifies. As the designer specifies cabinetry and millwork, tile and flooring, fixtures, lighting and appliances, we price those exact selections with our trades and suppliers, along with the engineering requirements.
Compared against the preliminary budget. We present that pricing to you next to what we carried for the same item in the preliminary budget. You see where the design is coming in under, on or over, and you decide where to spend and where to pull back.
Design decisions are priced as they come up. A design can look simple on paper and still need substantial structural or mechanical work. We identify that early, price it and offer alternatives, so if something is pushing past your target, you find out while it’s still a drawing.
By the end of design development, the budget is built from trade and supplier pricing against the drawings and specifications, and anything not yet specified carries an allowance. That pre-construction budget is what we manage the project against.
Step 4: Permits, Hazardous Materials and Investigation
Some of this has to happen early because it can change the design.
Permits. Depending on the work, you may need building, plumbing, electrical and gas permits. In most BC municipalities, electrical and gas permits come from Technical Safety BC, not the city. Strata properties need strata approval as well, which is a separate process from the municipal permit. Our permit guide covers the rules municipality by municipality.
Hazardous materials. WorkSafeBC requires a qualified person to check for hazardous materials before renovation or demolition work that could disturb them. They’re most common in homes built before 1990, but testing, not the age of the house, tells you what’s there. We arrange the testing and, where needed, the abatement before affected materials are disturbed.
Investigation. We don’t open up the whole house before preparing a budget. But where a high-risk area could change the scope, such as a suspect beam, a sagging floor or a drain line that may not have the slope we need, we have an engineer look at it or do targeted exploratory work before construction.
Step 5: How Pricing Works
The pre-construction budget is what we manage the project against. It isn’t a fixed price. Construction costs are tracked and billed transparently, and as work progresses we monitor actual costs against the budget and keep you informed.
You see the numbers as they happen. Trade quotes, invoices and budget tracking are in your client portal, and we invoice twice a month with the backup attached. When something unexpected turns up behind a wall, it shows up as its own line: what we found, what it costs and what we recommend.
Step 6: Construction
Demolition, structural work, framing, plumbing, electrical, HVAC, insulation, drywall, cabinetry and finishes all have to happen in the right order, with trades that don’t undo each other’s work. Coordinating that is our job.
What you can expect from us during construction:
Daily site reports with photos in your client portal, so you know what happened on site every day.
Weekly on-site meetings. These are in-person meetings at the house, not calls.
Decisions posted to the portal with due dates, so nothing holds up the schedule waiting on a selection.
Unexpected conditions handled the same way every time: what we found, the options, and what each costs in money and schedule. You decide.
A two-year workmanship warranty after completion.
What to Have Ready Before You Contact Us
You don’t need a design package. These help us give you useful advice from the first conversation:
Property details: the address, approximate age and size of the house.
Photos or floor plans: existing plans help, but photos are enough to start.
Your wish list: what you want to change, and what matters most.
An approximate budget: what you’re comfortable spending.
Timing: when you’d like construction to start and finish.
Living arrangements: whether you plan to stay in the house during construction.
If you don’t have every answer, the first conversation is where we start working through them.
Still Looking for a Home?
If you haven’t bought yet, find out what the renovation will cost before you commit. Our guide, Buying a Home to Renovate in Metro Vancouver, covers what to look for, how to evaluate a house and when a pre-purchase contractor walkthrough is worth it.
Ready to Start?
A renovation starts well before demolition. It starts with knowing what you want, what the house will allow and what it will cost to build, before you’ve paid for a design you can’t afford.
Just bought a house you’re planning to renovate? Contact Roka Projects with the address, what you want to change and your approximate budget. We’ll tell you what the right next step is.